Air bubbles in injection molded transparent parts will affect the appearance quality of products. At the same time, it will also reduce the strength of injection molded products. Even tiny air pockets can ruin appearance and weaken the part. So what causes bubbles, and how can they be prevented?
Several factors in material preparation, mold design, and process parameters can contribute to bubble formation. Insufficient drying, fast injection, poor venting, and low pressures allow air to become trapped in the molded part.
Table of Contents
This in-depth guide explores the root causes of bubbles in injection molding and proven methods to eliminate them. With optimal materials, scientific molding practices, and process fine-tuning, you can banish bubbles and produce flawless plastic parts.
Role of Insufficient Drying
Many plastic resins are hygroscopic, meaning they absorb ambient humidity. Nylons, polycarbonate, PET, TPU and other materials can contain significant moisture unless properly dried prior to molding.
When exposed to barrel heat, this moisture turns to steam. As the steam expands, it creates bubbles in the melt that get locked into the finished parts. Even tiny amounts of moisture can cause major bubble problems.
Thoroughly drying materials per the supplier’s recommendations, usually to under 0.2% moisture content, is crucial. Drying time and temperature vary by resin. Desiccant wheel dryers or hopper dryers ensure plastic is bubble-free.
Effects of Trapped Air in Resin
Even with drying, air can still infiltrate plastic pellets during transportation and handling, creating pockets that form bubbles.
Vacuum conveying after drying minimizes air introduction. Good housekeeping to avoid contamination and careful pouring of material also helps. Always use air displacement pours rather than drop pours.
Proper drying and air loss prevent bubbles from built-in air pockets in the raw plastic.
High Injection Speed Effects
Excessive injection speed causes turbulent, non-laminar melt flow into the cavity. The turbulent flow whips air into the polymer, creating micro bubbles.
Slower, controlled speeds allow for smoother laminar flow that prevents air entrapment. Scientific molding practices optimize gate velocity for bubble-free filling. Modern controls permit reducing velocity as cavities fill.
Bubble-prone resins like PC, PMMA, and PET require the most conservative injection profiles. Set speeds based on fill simulations.
Impacts of Excessive Resin Volume
Overfilling the injection barrel degrades the plastic from prolonged exposure to heat. This degraded resin has lower viscosity that incorporates gasses given off during decomposition.
Closely matching shot size to part volume eliminates excess resin. Sufficient back pressure provides a cushion for any variation while minimizing degradation.
Avoiding oversized shots and maintaining proper back pressure gives resin the minimum required residence time.
Effects of Poor Venting Design
Inadequate mold venting provides no escape path for trapped air during filling. The air has no choice but to be encapsulated as bubbles.
Vents must be sized and located appropriately to give air an unimpeded route to evacuate the cavity. Proper vent depth, angle, and polished surfaces facilitate air removal.
Vacuum venting also aids bubble reduction by actively pulling air from the mold.
Low Mold Temperature Influence
Cooler steel molds cause the plastic to freeze off quicker before trapped gases can vent. The frozen flow front prohibits bubble movement or escape.
Warmer mold surfaces (under controlled conditions) keep material fluid longer, allowing more time for venting and bubble elimination.
Balancing fill and pack times with sufficient mold temperature gives bubbles the window needed to fully clear the cavity.
Adjusting Injection Location
Sub-optimal gate locations can cause filling imbalances that trap air in cold runner molds. Realigning the gate can dramatically improve flow front progression and venting.
Use mold filling simulations to identify problem areas and experiment with adjusted injection locations. A change of even a few millimeters can distribute flow more evenly.
Proper gate positioning tailored to the mold and material prevents air entrapment in the first place.
Employing a Full Prevention Strategy
Addressing each of these factors using a holistic scientific approach minimizes bubbles in injection molded parts:
- Thoroughly dry hygroscopic materials before molding
- Convey and handle resins to avoid air ingestion
- Set conservative injection speeds based on the material
- Size shot volume closely to part geometry
- Design vents appropriately for air evacuation
- Use vacuum venting for active air removal
- Identify optimal gate location through analysis
- Allow sufficient mold temperature for venting
Rather than attacking symptoms, this methodology resolves root causes for permanent bubble reduction. Combining robust process controls with fundamental attention to materials and mold design establishes a foundation for flawless, void-free molding. Tiny adjustments make big differences.
With expertise and persistence, zero bubbles is an achievable goal using scientific principles. The result is perfect aesthetics and optimal strength.
CASE STUDY:

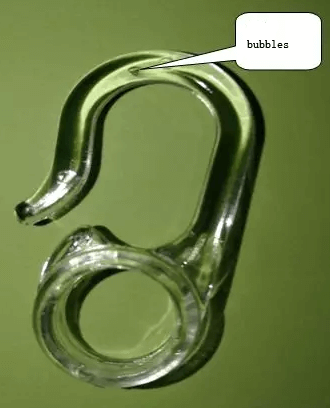
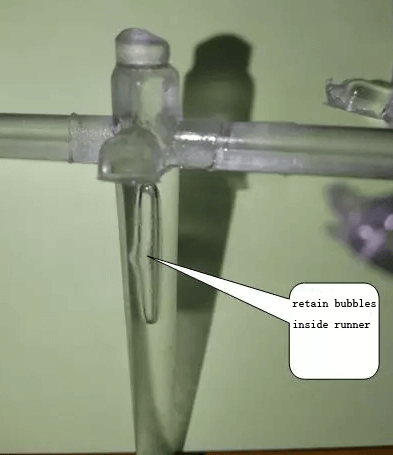
The curve part of this product is easy to get bubbles, and the solution steps :
- raw materials should be fully dried. (120℃、4h)
- Properly reduce the screw temperature and the temperature of the nozzle to prevent premature melting and decomposition of PC materials, and air cannot be eliminated.
- Because the gate is small, it is difficult to squeeze bubbles out of the cavity by increasing the holding pressure and time.
- This product is designed with a cold runner , so the best solution is to keep bubbles on the nozzle material. (Increase the injection position of the first stage, reduce the injection speed of the first stage and appropriately increase the back pressure )

